

This article applies to those who have a telescope with a German equatorial mount. Most GEM’s have setting circles that can be calibrated with the celestial coordinates, and if you learn how to properly read and use them, then it helps guide your telescope to the general direction of what you’re looking for!
Equatorial Mounts are designed to compensate for the Earth’s rotation by having one rotational axis parallel to the axis of Earth’s rotation. When set up correctly, the only manual adjustment one has to make is a simple twist of a slow motion control to get the object back in view.
As stated in Using the Celestial Coordinates, Right Ascension is the equivalent of Earth’s longitude, and Declination is latitude.
A German Equatorial Mount
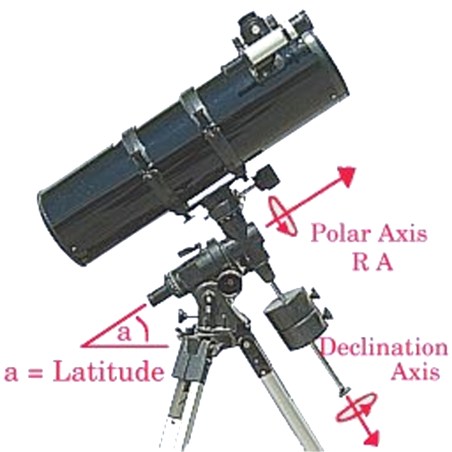
Most amateur telescopes with an equatorial mount are the German Equatorial Mount, or GEM. The structure of the mount is in the shape of a T, with the lower bar being the RA axis and the upper bar being the Dec. axis. The telescope itself is placed above the upper bar. with a counter weight placed below it. This keeps the telescope balanced, making it much less of a hassle when letting go of the tube after loosening the locks.
It needs to be polar aligned first!
The lower bar also serves as your polar axis, and depending on the hemisphere you’re observing from, it needs to be aligned with your celestial pole. Northern hemisphere observers have the privilege of using Polaris as a pole star.
Make the R.A. axis aligned to your celestial pole accurate as possible, either using a compass or using your pole stars to find true north/south.

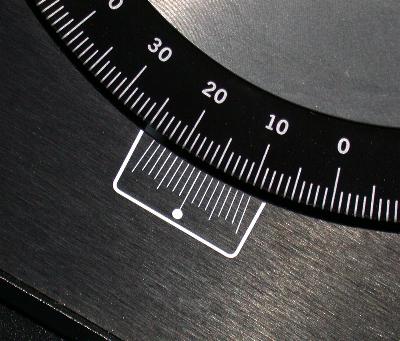
The angle of the lower bar serves as your latitude marker, and there should be controls and a right triangle with the numbers 0-90. As an example, if your latitude is 34° north or south of the equator, then you should set the latitude marker to 34.° This angle is super important for later.
Some GEM’s have polar finder scopes, or even just an opening where you can look through and see if your polar axis is directly lined up with Polaris. The closer you are in alignment the more accurate the setting circles get.
About the Setting Circles Themselves
On the mount, there are two setting circles. Take note of which are movable, and which are stationary. The stationary setting circles have a pointer that moves, while the movable circles usually have a stationary pointer.
Declination
The top one under the upper bar is your Declination. You can see that the numbers on it are 0-90-0 on each side. Declination coordinates range from +90° at the north celestial pole, to 0° at the celestial equator, to -90° for the south celestial pole.
If your telescope is polar aligned, the Dec. should be pointed to +/-90 by default.
Right Ascension
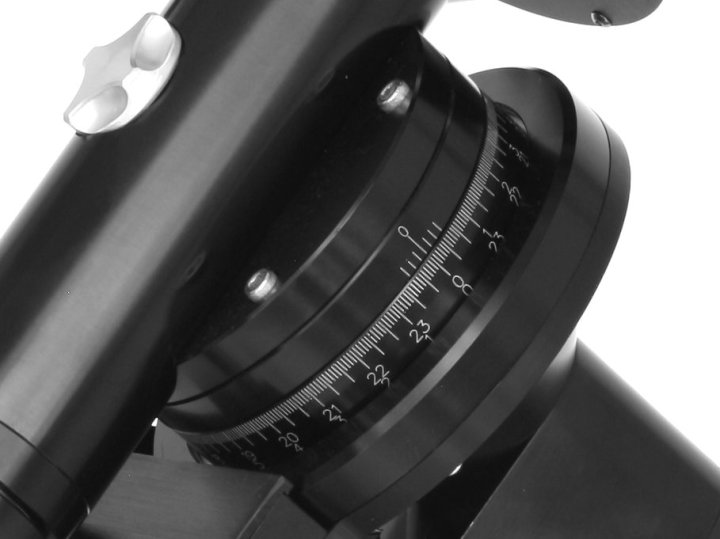
The setting circle that’s on the lower bar is the Right Ascension. As RA Coordinates are measured in hours and minutes, the numbers range from 0-24 hours with minute increments in between them.
The setting circles for RA often have two sets of numbers that are going in opposite directions. Unless otherwise stated in your instruction manual, northern hemisphere observers use the bottom set of numbers!
Calibrating the Setting Circles
It is recommended to use a bright naked eye star that can be found with ease. Then you adjust the setting circles to match the coordinates of that bright naked eye star.
So as an example, we are going to find M 13. Vega is a good candidate as an alignment star, so we will use that. Here are the following coordinates.
Vega – RA 18h 36m 56s | Dec +38° 47′ 1″
M 13 – RA 16h 41m 41s | Dec +36° 27′ 35″
Setting the Declination
By default, the telescope should be pointed due north (or south in southern hemisphere). If it is pointed due north, then the pointer arrow should already be set to 90. If your Dec. circle is movable and the pointer isn’t on 90, move the circle until it is and then lock it.
Now move your telescope to Vega and center it. If it is done correctly, you should see the arrow pointing at or near +38°. If it isn’t, then either the telescope isn’t properly polar aligned, or the circles didn’t properly move when you moved the scope. After getting it to +°38, and at 47′, you should be two thirds of the way between +38 and +39.
Even if it doesn’t automatically point to +38 after you’ve slewed to Vega, but your setting circles are movable – then at least set the DEC dial to have the arrow be pointed at 38 for calibration purposes.
Setting the Right Ascension
With the DEC set, then get the RA setting circles in the right spot.
Always check with your instruction manual, as one row of numbers is for the northern hemisphere, and the other for the southern. The instruction manual will tell you which set is for which – and using the wrong set will result in you pointing in the opposite direction.
Using the correct set of numbers, move the circle until the arrow is pointed at 18h, and then using the increment lines between 18h and 19h, get it as close to 36m as possible.
If you have both setting circles on the correct coordinates for Vega, then you are now calibrated and are ready to go to M 13.
Moving it to Your Target
It can be done in any order, but start with one coordinate, make sure it’s correct on the dial, lock it, and then move the other until the object comes into view.
Remember to use as wide of an eyepiece as possible to account for being off by a degree or two. A square degree covers a small patch of the sky (the equivalent of 4 minutes in RA), and a 10 minute difference in RA is 2.5 degrees across. Take into account for how wide of a field your eyepiece covers.
Declination– in this case of finding M 13 from Vega, M 13 is 2 degrees south of Vega in Declination, so make sure when you slew the telescope from 38 to 36, your tube is moving south, not north! Your Dec. reading should now read +36°, and at 27′ it should be close to half way between +36 and +37.
just remember, in the Northern hemisphere… if the desired DEC coordinate is higher than the initial calibrated object, then you’re slewing north, and if the number is lower, or goes down into the negative number territories, then you’re slewing south
Right Ascension – The hour order of RA coordinates are in the same east to west direction as Earth’s rotation. For example, using the RA hour coordinate of 5h, anything numerically higher (6h, 7h, so on…) is east, and anything lower is west. That’s because with any respective hour coordinate, anything lower rises and sets before, and anything higher rises and sets after. Once you get up to an RA of 23h 59m 59s, then the RA value resets back to zero as you move east through the coordinates.
Since Vega is at 18h and M 13 is at 16h, that means you need to move it west. Move the telescope until the arrow is pointed at 16h, and using the increment lines between 16 and 17, as close to 41m as possible.
At this point, if you did it correctly, you should be able to see the star cluster come into view!
If you don’t see what you’re looking for, it could be due to poor polar alignment, or errors in moving the setting circles during calibration, to errors in reading them, or you may have confused the RA hour angles between north and south due to the two sets of numbers.
Remember that you can always go back to your calibration star, reset the circles, and try again!
Calibrating During the Day Time
Let’s say you want to check out Venus during the day or try for a bright enough star, but you have no calibration stars to work with… well wait… actually you do – it’s the Sun!
Assuming that you have gotten your mount as aligned with your celestial pole as much as possible and that you have a proper filter, you can slew your scope to the Sun, and then calibrate the setting circles based on the RA/DEC position the Sun is in on that given moment – stargazing apps are good for that. IF the Moon is visible enough, you can do the same thing as well if you don’t want to use the Sun.
Once you have calibrated with the Sun/Moon, then do the same technique with the setting circles that you would do at night – start with the DEC, then move along the RA until you spot it. Venus should easily be seen through the finder scope, while Jupiter and Sirius are difficult but possible with a large enough finder. Bright stars like Arcturus and Vega are almost impossible through finders, but if the actual scope is big enough, and if you’re accurate enough, then after locking it on the DEC axis, you should be able to find it along just the RA axis. You should have already made sure the scope was focused when calibrating to the Sun/Moon – otherwise you won’t see any sharp points of light at all.
Using the setting circles may be a long task, but when practicing them and getting them done right, it makes finding any deep sky object much easier! You’ll find many things you couldn’t otherwise find by simple eyeballing techniques!
